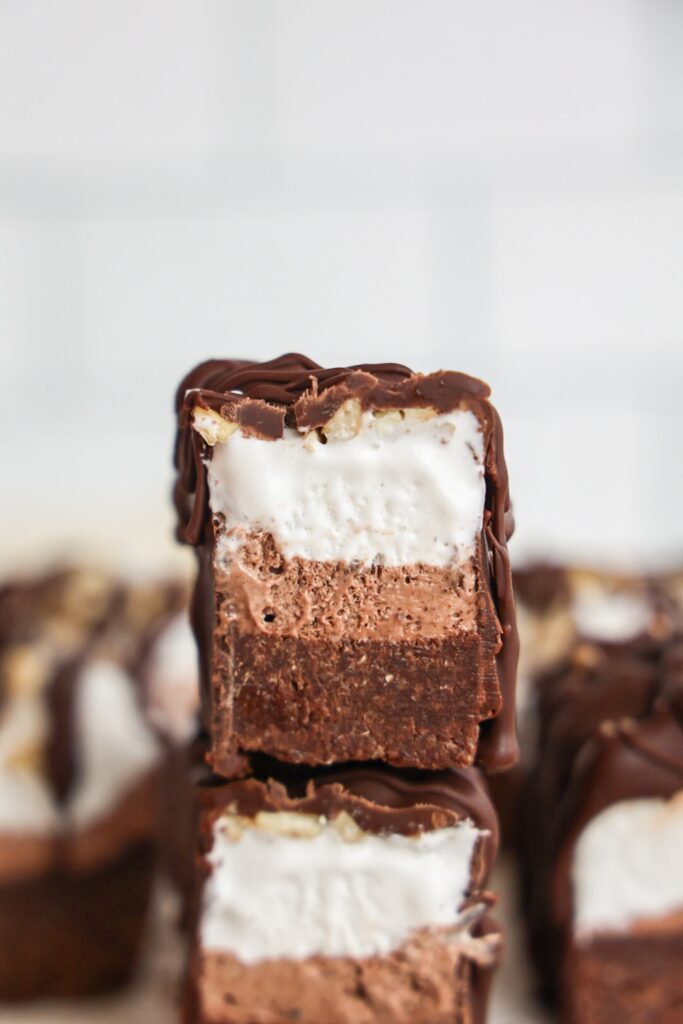
No-bake ice cream brownie bites start with a chewy, no-bake brownie base and are topped with two layers of coconut whipped topping! They are minimal ingredient, lower in sugar, dairy-free and vegan, and gluten-free! These make the most delicious, healthier frozen dessert that taste almost like a brownie and 3 Musketeer!
No-bake Brownies – Healthy Brownie recipe
I grew up on Cool Whip Candy. Essentially it’s cool whip and chocolate mixed together and frozen. It almost becomes this nougat-y texture, similar to that of a 3 Musketeer. I knew I wanted to create some form of ice cream brownies and had this idea to create a cross between an ice cream bar and 3 Musketeer and they turned out incredible! Using vegan coconut whipped topping was a great way to keep these bars incredibly easy, while also being dairy-free, gluten-free, and lower in sugar!
Video – how to make ice cream brownie Bites
Why you’ll love this recipe
- Easy: These look decadent and like you spent time on them, but they’re so incredibly easy to make! They come together in under 15 minutes with simple ingredients!
- Dietary friendly: These ice cream brownie bars are gluten-free, dairy-free, vegan, and can be made nut-free!
- Wholesome: Made without gluten, refined sugar, and dairy, these bars come together with simple ingredients like oats, cacao powder, nut butter, and are naturally sweetened with maple syrup.

How to make ice cream brownie Bites
Full recipe is in the recipe card at the bottom of the post!
Ingredients
- Oat flour – Out flour acts as the base of the brownie bars! I opted to use this over almond flour so that hopefully more people can enjoy!
- Cacao powder – I prefer to use raw cacao powder, because it’s packed with antioxidants!
- Maple syrup – agave or honey can also be used, however I think the flavor of maple syrup works best!
- Nut Butter: almond or cashew butter are the best options here as they’re neutral than peanut butter. However, peanut butter is still a delicious option if peanut butter brownie bars are what you’re going for! Sunflower seed butter is a great nut-free option!
- Coconut oil
- Pantry staples: vanilla extract, sea salt
- Coconut whipped topping – The brand So Delicious is great and the ingredients are pretty clean!
- Chocolate chips – Use your favorite chocolate! Evolved Chocolate and Lily’s are great sugar-free chocolate options and Hu Kitchen is sweetened with coconut sugar!

Steps
- Make the brownie base – in a food processor or large bowl, combine all of the ingredients. Process or mix well until dough forms. It should stick together but not be super sticky to where it sticks to your hands. Press the dough into the bottom of a parchment-lined loaf pan.
- Assemble the bars – In a bowl, add half of the tub of coconut whipped topping. Add in the cacao powder and nut butter, mixing well until no lumps remain. Spread this over the brownie layer. This is optional, but I like to add vanilla extract into the remaining coconut whip. Then spread this over top of the chocolate layer. You can sprinkle some chopped peanuts, almonds, or cashews over top of the coconut whip for crunch!
- Freeze! Place the pan in the freezer overnight or for at least 6ish hours until it’s completely solid.
- Dip in chocolate – There are two methods here (I wish I would have done the first – it’s much easier!). I’d recommend pouring the chocolate over-top of the frozen bars, spreading it out even, then placing them back in the freezer for 30 minutes. Then you can remove them from the pan and cut into bars. Alternatively, you can drizzle the chocolate over the bars or to use a spoon to pour melted chocolate over them and using the back of the spoon to spread it around the bar. You don’t want to fully dunk them, as the coconut whipped topping will melt!
FAQ’s
- Storage: Store brownie bars in and air-tight container in the freezer! They will melt if left out and will become too soft if left in the fridge. They should last up to two months in the freezer (I wouldn’t know, we always inhale them LOL).
- Can I use ice cream instead of whipped topping? Yes! Just let the ice cream thaw on the counter for 10 minutes or so until it’s less firm, spread it over the brownie base and then freeze until completely solid. Then continue with the remaining steps!
- Want to up the protein? Feel free to swap 1/4 of the oat flour for your favorite protein powder and/or add a scoop of your favorite protein into the whipped topping prior to spread it on the brownie base!

More healthy no-bake desserts to try
- Healthy rice crispy treats without marshmallows
- 2 ingredient fudge
- No bake peanut butter oatmeal fudge bars
- Healthy vegan fudge bites
- 3 ingredient fudge stripe cookies
- Frozen protein s’mores
- Peanut butter cup frozen yogurt bars
- Healthy Dilly Bars
If you try this recipe and love, it’d mean the world to me if you left a star rating & review below and tag me in your creations on Instagram @danishealthyeats!

Ice Cream Brownie Bars
Ingredients
Brownie base
- 1 cup oat flour *feel free to sub 1/4-1/2 with your favorite protein powder!
- 3/4 cup cacao powder
- 1/2 cup + 2 tbsp almond, cashew, or peanut butter (or sunflower butter for nut-free) *see notes
- 1/3 cup maple syrup
- 2 tbsp coconut oil, melted
Filling
- 2/3 tub coconut whipped topping (I like So Delicious), divided *feel free to stir in a scoop of your favorite protein powder!
- 2 tbsp cacao powder
- 2 tbsp almond, cashew, or peanut butter
Coating
- 1 3/4 cups chocolate chips
- 1 tbsp coconut oil
Instructions
- Make the brownie base – in a food processor or large bowl, combine all of the ingredients. Process or mix well until dough forms. It should stick together but not be super sticky to where it sticks to your hands. Press the dough into the bottom of a parchment-lined loaf pan.
- Assemble the bars – In a bowl, add 1/3 of the tub of coconut whipped topping. Add in the cacao powder and nut butter, mixing well until no lumps remain. Spread this over the brownie layer.
- This is optional, but I like to add the second 1/3 of the whipped topping to a bowl and add in 1 tsp vanilla extract. Then spread this over top of the chocolate layer. You can sprinkle some chopped peanuts, almonds, or cashews over top of the coconut whip for crunch!.
- Freeze! Place the pan in the freezer overnight or for at least 6ish hours until it’s completely solid
- Coat in chocolate – There are two methods here (I wish I would have done the first – it’s much easier!). I’d recommend pouring the chocolate over-top of the frozen bars, spreading it out even, then placing them back in the freezer for 30 minutes. Then you can remove them from the pan and cut into bars. Alternatively, you can drizzle the chocolate over the bars or to use a spoon to pour melted chocolate over them and using the back of the spoon to spread it around the bar. You don’t want to fully dunk them, as the coconut whipped topping will melt!
Video
Notes
- Storage: Store brownie bars in and air-tight container in the freezer! They will melt if left out and will become too soft if left in the fridge. They should last up to two months in the freezer (I wouldn’t know, we always inhale them LOL).
- Can I use ice cream instead of whipped topping? Yes! Just let the ice cream thaw on the counter for 10 minutes or so until it’s less firm, spread it over the brownie base and then freeze until completely solid. Then continue with the remaining steps!