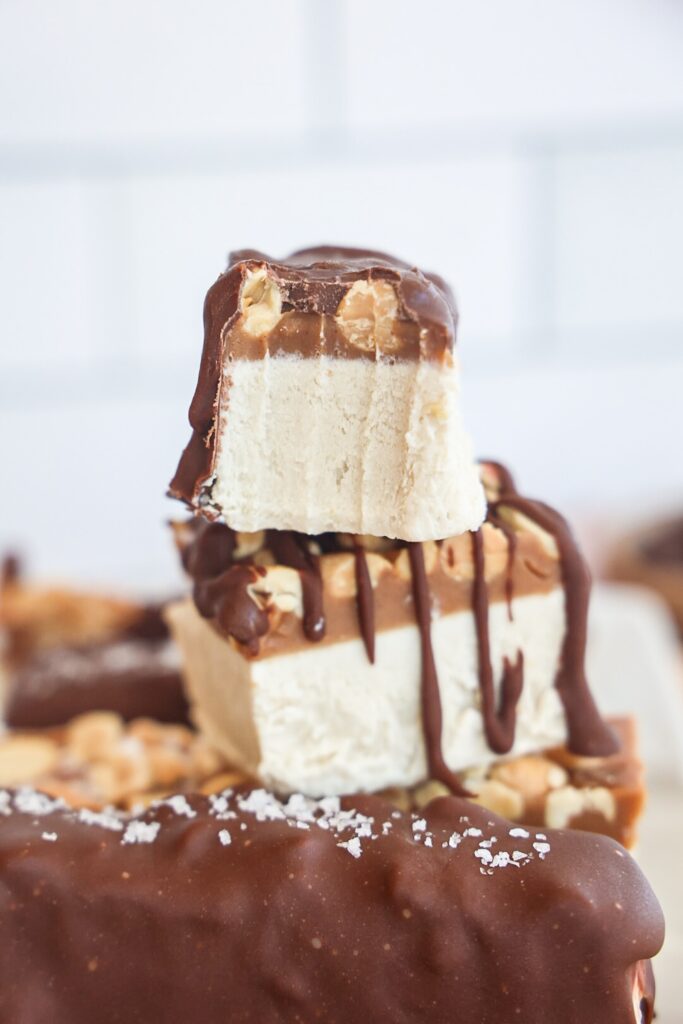
These healthier vegan Snickers ice cream bars have a dreamy, creamy ice cream base, are topped with a crunchy peanut caramel, and then coated in a crunchy chocolate shell! They are gluten-free, refined sugar-free, and made with wholesome ingredients – the ultimate frozen dessert for summer!
Snickers Ice Cream
Ever since the beginning of starting Dani’s Healthy Eats, I have always had a love for creating healthier versions of nostalgic treats and candies. Snickers were always my weakness growing up – something about peanut butter, chocolate, nougat, and crunchy peanuts that is hard to resist. I’ve created a plethora of Snickers-inspired recipes over the years, but these ice cream bars are one of my favorites!
If you’ve ever wished your favorite candy bar came in a healthier, ice cream version—this is it! These Healthy Vegan Snickers Ice Cream Bars are every bit as decadent and delicious as the real thing but made with nourishing, plant-based ingredients you can feel good about. They’re gluten-free, dairy-free, refined sugar-free, and taste just like a frozen Snickers bar! I added some protein powder to up the protein content and keep things a little more balanced, but this is also optional!
I promise they’ll satisfy that candy craving, and then some! Love snickers desserts? Try my snickers cookies, snickers ice cream cake, & my snickers protein bites. You will also love my copycat Klondike Bars!
Why You’ll Love These Snickers Ice Cream Bars
- Vegan & Dairy-Free: Perfect for plant-based diets or those with dairy sensitivities! They’re also naturally gluten, grain, and refined sugar-free making them a Paleo dessert!
- Naturally Sweetened: A little maple syrup can add so much to a recipe without the need to add tons of artificial sweeteners or refined sugar.
- Creamy & Crunchy: A smooth vanilla ice cream base with gooey caramel & crunchy peanuts!
- Easy to Make: Simple steps and quick to throw together – just takes a little patience while they set!
- Perfect for Summer: A refreshing, satisfying frozen dessert to beat the heat!
recipe video – homemade snickers ice cream bars
How to make homemade snickers ice cream bars
Full recipe is in the recipe card at the bottom of the post!
Tools needed
- Blender – I love my Beast Blender!
- Loaf pan or silicone mold
- Mixing bowl

Ingredients You’ll Need
Ice Cream Base:
- Full-fat canned coconut milk – I have not tried testing substitutes, however I think a full-fat non-dairy creamer like NutPods may work (although I can’t guarantee it’ll turn out as creamy!).
- Raw cashews – this creates the creamy ice cream-like base! Cashews are neutral in flavor, and packing a ton of nutrients, so they make are great in vegan ice cream substitutes!
- Maple syrup – you can also use honey but I love the flavor maple syrup gives!
- Protein powder – this is totally optional, but I think it adds so much texture, flavor, and sweetness! I use Vanilla Buttercream from Macro Mike. It really gives that authentic vanilla ice cream flavor! You can use my code “amb-dani” for a discount!
- Vanilla extract & sea salt
Caramel
- Peanut butter – crunchy or creamy peanut butter will work!
- Maple syrup – agave or honey can be substituted but keep in mind honey won’t give that “caramel” flavor.
- Coconut oil – this helps thin the caramel layer out while also helping it firm up when frozen so it doesn’t ooze out of the bars!
- Vanilla extract & pinch of sea salt
- Chopped peanuts (omit the salt if the peanuts are salted!) – If you’re looking for a peanut-free version, use salted cashews!
Crunchy Peanut Layer & Chocolate Coating:
- Chocolate chips/chopped chocolate – (dairy-free if needed!)
- Coconut oil – this helps thin the chocolate out and makes coating the bars much easier!


How to Make Vegan Snickers Ice Cream Bars
Step 1: Soak Your Cashews
If you don’t have a high powered blender, soak the cashews in hot water for 20 minutes. Simply bring a pot of water to a boil, remove from heat, add the cashews, and let soak for 20 minutes. Drain, then use.
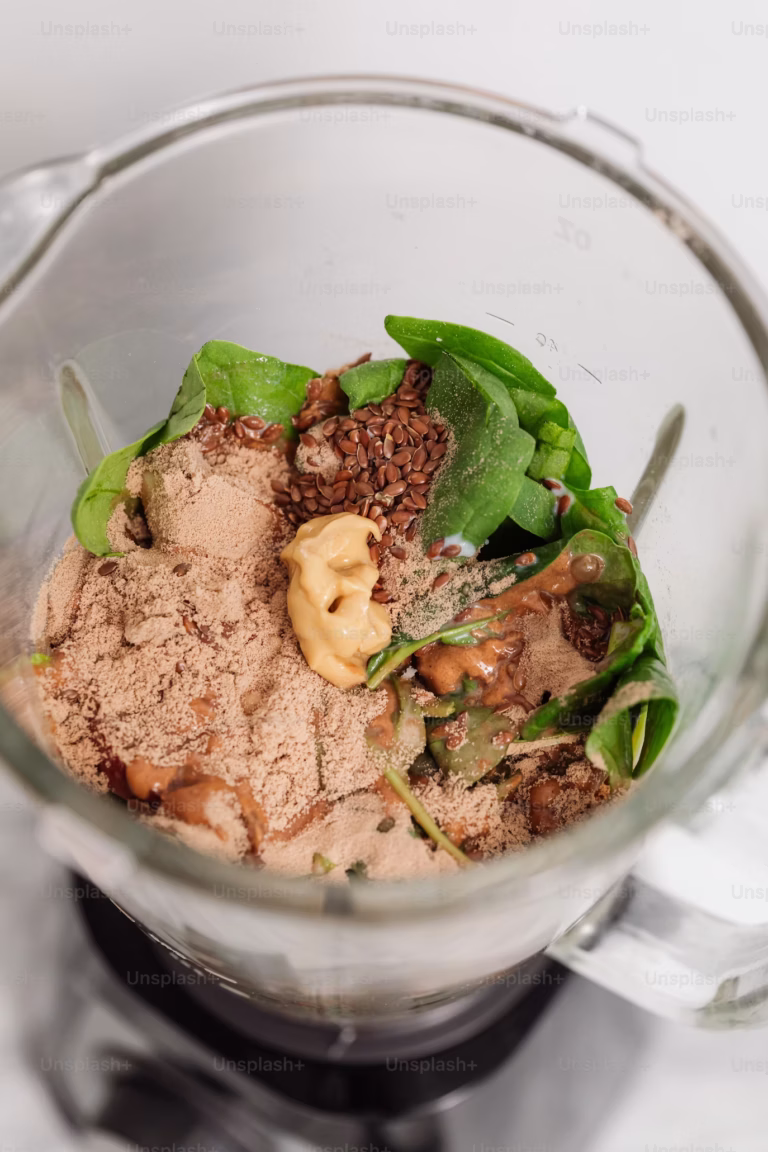
Step 2: Blend the Ice Cream Layer
In a high-speed blender, combine all of the ice cream layer ingredients together until blended and smooth. You can taste & adjust as you’d like!
Step 3: Pour and Freeze
Pour the mixture into a lined loaf pan or silicone bar molds. Freeze for 2-3 hours, or until firm enough to add the caramel layer on top.
Step 4: Make the Caramel & Assemble
Combine all of the caramel ingredients in a small bowl until smooth. Spread the caramel evenly over the frozen ice cream base. Sprinkle peanuts over the caramel and press down slightly.
Step 6: Freeze Again, Then Slice
Freeze for another 2 hours or until completely solid. Slice into bars.
Step 7: Dip in Chocolate
Melt chocolate chips and coconut oil together, then dip each bar to coat. Place back in the freezer for 10–15 minutes to set. Then move to an air-tight container and store in the freezer.

Storage
Store these Snickers ice cream bars in an airtight container in the freezer for up to a month. Let them sit at room temperature for a few minutes before eating for the best texture!
Why These Are the Best Healthy Snickers Bars
Unlike traditional recipes that use heavy cream, corn syrup, and sugar-laden caramel, this version uses whole food ingredients to replicate the flavor and texture in a more nourishing way!
- Coconut milk and cashews create a luscious, creamy base.
- Dates provide natural sweetness and a rich caramel-like flavor.
- Dark chocolate and peanuts give you that classic Snickers crunch and taste!
Recipe Variations
- Nut-Free? Use sunflower seed butter and roasted sunflower seeds. You can also use granola butter and rice cereal instead of chopped nuts. For a peanut-free option, use cashew butter for the caramel and chopped salted cashews for the crunch!
- Extra Protein? Add a scoop of collagen to the ice cream layer. This adds protein without affecting the texture (don’t add more plant-based or whey protein though, as this can affect the texture). Collagen absorbs into things really well without changing the texture!
- No Cashews? For the base, try using soaked macadamia nuts!
More Healthy Frozen Dessert Recipes
- Snickers cookies
- Snickers ice cream cake
- Healthier copycat Klondike Bars
- Homemade Dilly Bars
- Cookie dough ice cream bars
- Strawberry frozen S’mores
- 2 ingredient Rolo’s
- Strawberry shortcake protein ice cream (ninja creami)
If you try this recipe and love, it’d mean the world to me if you left a star rating & review below! Tag me in your creations on Instagram @danishealthyeats!

Homemade Snickers Ice Cream Bars
Ingredients
Ice cream
- 1 can full-fat coconut milk *be sure to read instructions!*
- 1/4 cup coconut yogurt or greek yogurt
- 3/4 cup raw cashews
- 2 scoops vanilla protein powder
- 4-5 tbsp maple syrup or honey
- 1 tbsp vanilla extract
- 1/2 tsp sea salt
Peanut butter layer
- 3/4 cup peanut butter
- 1/4 cup maple syrup
- 3 tbsp coconut oil
- 1 scoop collagen *Can omit. Do NOT add protein powder of any kind. Collagen absorbs into anything without affecting the texture. Protein will not!
- 1 tsp vanilla extract & good pinch of sea salt (omit the salt if your chopped peanuts are salty!)
- 1/2 cup chopped peanuts
Chocolate coating
- 1 1/4 cups chocolate chips
- 1 tbsp coconut oil (to help thin the chocolate coating)
Instructions
- Place the can of coconut milk in the fridge for an hour or two.
- In a blender, add the cream from the top of the can of coconut milk, along with 1/4 cup of the liquid. Add the remaining ingredients for the ice cream base (cashews, protein powder, maple syrup, greek/coconut yogurt, vanilla, sea salt). Blend until smooth. Taste & adjust as you'd like.
- Line a loaf pan with parchment paper or use a silicone bar mold. Pour the ice cream mixture into the pan. Freeze for 3-4 hours until completely firm – you want it firm enough to pour the caramel over.
- Once it's firm, add the caramel ingredients to a small bowl, mixing until smooth. Pour it over the ice cream base, spreading it out evenly. Sprinkle the chopped peanuts over top.
- Place back in the freezer for another 2-3 hours. You'll want it to be pretty firm before cutting into bars. Once firm, remove from the pan. Use a sharp knife to cut the mixture into bars. Place them on a parchment-lined baking sheet or large plate and place back in the freezer while you melt your chocolate.
- In a wide bowl, combine the chocolate and coconut oil. Heat in 30 second increments, stirring well between each, until smooth. Take the bars out of the freezer. Quickly dunk each one, using a fork to lift it out of the chocolate and let the excess drip off.
- Place back on the parchment-lined baking sheet. Return to the freezer for 30 minutes or so until firm. Then move to an air-tight container or baggie and store in the freezer!
- Thaw 5 minutes or so prior to eating for the creamiest texture!


Hi, these look amazing! I’m mid way through the recipe steps…it appears that you haven’t stated how many dates to use for the caramel layer? Or maybe I’ve totally missed the data. Would you be kind enough to share please, thank you so much 😊
hi! I am so sorry for the confusion – there is no dates in the caramel layer! I originally was going to use dates and decided against it and totally forgot to change it from “date caramel” to just “caramel”!
Apologies if you have this listed elsewhere, but I have a question as I begin gathering my ingredients: How much is 2 scoops of protein powder? Are your scoops equivalent to 2 tablespoons each or is there a different “scoop” you use?
Thanks!
Hi Alyson! I am so sorry for the confusion – one scoop is equivalent to 40g – usually about 2 1/2-3 tbsp!
5/5 10/10 100/100. This recipe is time consuming in that you have to WAIT to eat it but it’s soooooooooo worth it. I should start on a new batch now because these won’t last long in my house.