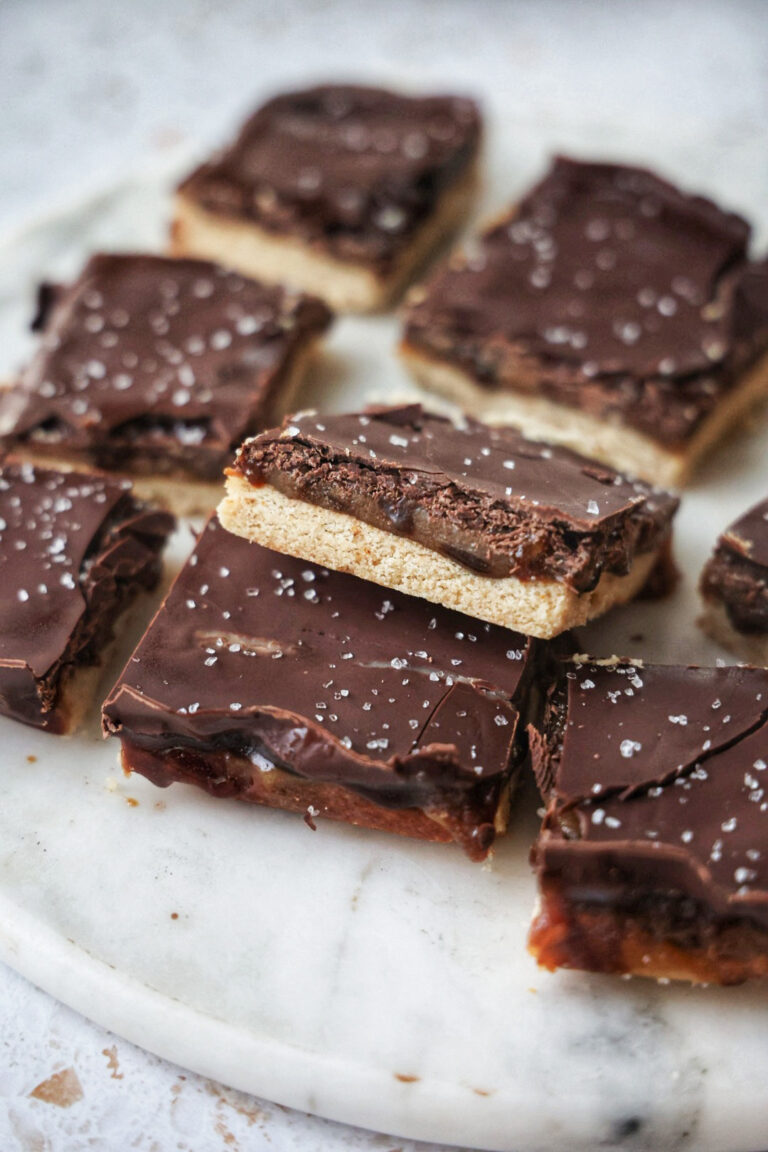
These coconut cookie bars have a shortbread cookie base, caramel and toasted coconut center, and are topped with decadent chocolate! Think.. healthy Twix bar with coconut! You will LOVE how easy these are to make and they’re vegan, gluten free, and refined sugar free!
*Disclosure: This post may contain affiliate links. I may earn a small commission for my endorsement, recommendation, testimonial, and/or link to any products or services from this website.

I have a thing for Girl Scout Cookie desserts. If you follow me on Instagram, you may have seen i’m doing a series, where I create healthier desserts inspired by the famous cookies! We’ve made no bake samoa cookies, homemade tagalong cookies, and samoa cookie inspired brownies!
Why you’ll love this recipe
- Easy to make!
- These coconut cookie bars are gluten free, vegan (dairy-free), and refined sugar free but taste so decadent!
- They have three easy layers but look like you tried hard 😉
- Cookie bars with coconut taste similar to a Samoa or Caramel Delite cookie!
- Makes a great healthy dessert or snack option
How to make coconut cookie bars
Equipment
- Mixing bowl
- Sheet pan
- Spatula
Ingredients
Cookie base:
- Almond flour: There is no 1:1 sub for almond flour, other than Cashew flour. However, if you can’t have nuts, i’ve left an oatmeal based cookie option in the recipe card!
- Coconut flour: Coconut flour helps create that crunchy cookie base and is more absorbent than most flours, so there is no 1:1 sub.
- Maple syrup: You can also use honey.
- Coconut oil
- Vanilla & Sea salt
Caramel toasted coconut filling:
- Cashew butter: I also love using almond butter! You can use peanut butter but beware it’ll give the recipe a peanut butter flavor.
- Unsweetened shredded coconut or flakes
- Maple syrup: You can also use honey or another sticky sweetener, however maple really gives these the best flavor!
- Coconut oil: Avocado oil, vegan butter, or ghee should all work as substitutes.
- Vanilla & Sea salt
Topping
- Chocolate chips or chunks: I like to use Hu Kitchen as they are DELICIOUS & refined sugar free. They make grass-fed milk chocolate and vegan dark chocolate! You can use my code “danishealthyeats” for a discount on any order!

Steps
- Make the cookie base: Simply combine everything in a large bowl until dough forms. Press the dough into the bottom of a lined bread loaf pan. Bake and then cool.
- Make the filling: In the same bowl, you can mix together all of the filling ingredients. Once the bas is cooled, spread the filling over top. Place the pan in the freezer for 1-2 hours to allow them to firm up completely.
- Melt the chocolate: Once the caramel layer is completey firm, you can make the chocolate coating. Melt the chocolate and coconut oil together until smooth. Then pour over top of the caramel layer, spreading it out evenly.
- Place the pan back in the freezer for 15 minutes until the chocolate is completely hardened. Remove the pan from the freezer. Cut into bars or bites.
How to toast coconut
It’s so simple! Add your coconut to a sheet pan. Bake in the oven at 325 degrees for 3 minutes. After 3 minutes, toss the coconut. Return to the oven to bake for another 3 minutes. Repeat this process until all of the coconut is golden!
Are paleo desserts healthier for you?
I know this can seem overwhelming and confusing! I think the best way to answer this question is that any treat, dessert, or something with higher amounts of sugar (besides fruit) should be enjoyed in moderation!
Paleo treats however, are made without gluten, grains, dairy, and refined sugar and are made with whole-food based ingredients. This doesn’t mean they are “sugar free”, just a healthier option than most desserts! Baking with paleo ingredients can ensure you’re getting a whole-food based option without any added crazy ingredients, preservatives, etc.

Are coconut cookie bars best eaten out of the freezer or fridge?
These are best in the freezer. I recommend storing them there. The cookie base stays crunchy and the filling stays fudgy. When you want one, you can eat it straight away OR let it sit out for 5-10 mins to soften just a tad. We think they are best this way!
If stored in the fridge, the texture just won’t be right and the shortbread won’t stay firm as they’re intended to!
FAQ’s, Tips, & tricks
- Do you have to add coconut oil to the chocolate topping? I do recommend adding it as it ensures your chocolate will be thin enough to spread out evenly and helps making the cutting into bars process a bit easier, so the chocolate doesn’t crack as much!
- How to cut clean bars/prevent chocolate cracking: After you pour the chocolate layer over the top, you’ll want to place the pan in the freezer for 10-15 minutes, then remove it and cut them into bars. You can then return them to the freezer, but this helps prevent messy, cracked chocolate. When you are ready to cut bars, running your knife under HOT water for a few seconds can help make this step a piece of cake!
- How to store leftover coconut cookie bars: Store leftover coconut cookie bars in an air-tight container in the freezer for up to a month!
- What If I don’t like coconut? Simply leave it out! Although, if you do like coconut, I HIGHLY recommend adding it in as the toasted coconut gives these so much extra flavor!
- Can these be made nut-free? You can use sunflower seed butter in place of the nut butter. If you need a nut-free substitute for almond flour, there is no 1:1 sub, so I left an oatmeal cookie base option in the recipe card below!
More healthy dessert recipes to try!
- Samoa cookie brownies
- Homemade tagalong cookies
- No bake samoa cookies
- Healthy Snickers Bites (no bake)
- 2 ingredient Rolo’s
- Chocolate covered yogurt bites
- 2 ingredient orange sorbet
- No bake peanut butter oatmeal fudge bars
If you try this recipe, it’d mean the world to me if you left a review below! Tag me on Instagram @danishealthyeats if you make them! x
Coconut Cookie Bars (Twix style)
Ingredients
Shortbread base
- 3/4 cup almond flour
- 1/4 cup coconut flour
- 1/4 cup maple syrup
- 3 tbsp coconut oil, melted
- 1 tsp vanilla extract
- pinch of sea salt
Caramel coconut filling
- 1/2 cup cashew butter *or almond butter
- 1/3 cup unsweetened coconut flakes or shredded coconut
- 1/4 tbsp maple syrup
- 3 tbsp coconut oil, melted
- 1 tsp vanilla extract
- pinch sea salt
Chocolate topping
- 1 cup chocolate chips
- 2 tsp coconut oil
Instructions
Cookie base
- Preheat the oven to 350F. Line a bread loaf pan or smaller baking dish (6×6) with parchment paper.
- Combine all of the base ingredients in a large bowl until dough forms. Press the dough into the bottom of the pan.
- Bake for 10-12 minutes until slightly golden around the edges. It's okay if it puffs up a little, simply use a fork to poke a hole in the base and it should flatten! Remove from the oven and let them cool completely.
Make the caramel coconut filling:
- Toast the coconut (do NOT skip this step!): Lower the oven to 325. Add your coconut to a sheet pan. Bake in the oven for 3 minutes. After 3 minutes, toss the coconut. Return to the oven to bake for another 3 minutes. Repeat this process until all of the coconut is golden!
- You can use the same bowl or grab another one. Combine all of the caramel ingredients besides the coconut in the bowl, mixing until smooth. Once smooth, stir in the toasted coconut. Pour the filling over the cookie base.
- Place the pan in the freezer for 1-2 hours, until it's COMPLETELY firm.
Chocolate topping
- You can melt the chocolate using the double-boiler method or in the microwave by adding the chocolate and coconut to a heat safe bowl and heating in 30 second increments, stirring well between each, until smooth.
- Remove the bars from the freezer and pour the chocolate over top, spreading it out evenly. Place the bars back in the freezer for 15 minutes, until the chocolate is firm.
- Cut them into bars or bites and sprinkle over flakey sea salt. Store in an air-tight container in the freezer (You an enjoy them straight from the freezer or let them sit out 5-10 mins before eating, but dont store in the fridge. The texture won't be how it's intended to be!)


this is a very easy recipe to follow and create a delicious, treat. The only challenge is most people don’t keep these type of ingredients in their home; it can get expensive buying all of the ingredients for a 1 time recipe. Otherwise I highly recommend trying this recipe. 2 thumbs up
Hi Dwayne! Aw, thank you for trying them, i’m so happy you enjoyed it! And I will definitely keep this in mind! I use these so often, so I think that can tend to slip my thoughts. Appreciate this feedback!